


By now you’ve heard of kombucha - the trendy health drink that was a $0.6 billion industry in 2015, and whose growth is expected reach $5.9 billion by 2029. Despite its status as a raging trend, what’s amazing about kombucha is that it is nothing new – it has been around for centuries, perhaps even as early as 221 BC in China, where it was known as the “tea of immortality.” Kombucha is historically known as a healing beverage, and it continues in that tradition today.
What is Kombucha?
Kombucha is a fermented tea made by combining tea, water and sugar with an existing SCOBY, which stands for “symbiotic colony of bacteria and yeast,” plus a bit of existing kombucha tea to get the process going. During fermentation, bacteria and yeast consume sugars and nutrients and in turn create beneficial byproducts.
What are the known benefits of kombucha?
The beneficial byproducts of kombucha fermentation include organic acids (primarily acetic acid, glucuronic acid and gluconic acid), B vitamins, vitamin C, amino acids, and enzymes. The most notable of these is the glucuronic acid, which is a powerful detoxifier. Glucoronic acid is produced by the body to flush toxins out of the system, but many factors can either over-load the liver or reduce its ability to work properly (alcohol, medications, environmental toxins, etc.), which makes the glucuronic acid in kombucha valuable.
Brew Your Own Kombucha
Summer is a great time to experiment with kombucha flavors using fresh berries and herbs from your garden or local supply!
You will need:
Water – Filtered or spring water is best for the health of the SCOBY.
Tea – Not all tea works well for kombucha. English Breakfast, Rooibos, or Jasmine tea are all good choices. Loose leaf or tea bags both work; organic is preferred.
Sugar – Processed “white” sugar should be used, as it is the easiest for the bacteria and yeast to consume. Organic is preferred.
A SCOBY – you can order these online, but even better is to get one from a friend who brews kombucha.
1 cup kombucha tea – you will likely be able to get some tea along with your SCOBY. If you can’t get existing kombucha tea, it’s ok to use a cup of vinegar instead.
4 quart or larger stock pot
Mesh tea infuser if using loose leaf tea
One gallon or larger glass container with a wide opening
Paper towels and a large rubber band to secure the paper towels over the glass container
Tightly sealing bottles, such as old wine bottles with screw-on caps, flip-top glass bottles or mason jars
1. Brew Sweet Tea
In a large pot, bring one quart (4 cups) of water to a boil on the stove. Remove from heat and, using a mesh tea infuser, add 2 tablespoons of loose leaf tea. If using tea bags, use 6 tea bags. Cover and let steep 10 minutes. Add 1 cup of sugar and stir to dissolve. Add an additional two quarts (8 cups) of cool water to the tea.
2. Combine Sweet Tea with SCOBY and Kombucha Starter
After adding the two quarts of cool water, the sweet tea should be only slightly warm. If the tea is too hot, it will kill the bacteria and yeast in the kombucha. Place your SCOBY, one cup existing kombucha or vinegar and brewed sweet tea together in your large glass container. Cover the container with a double layer of paper towels and secure with a rubber band. This will allow the kombucha to breath while keeping bugs and dust out.

3. First Ferment
Allow your kombucha to sit at room temperature for at least one week, and up to a month, generally speaking. The longer the kombucha brews, the lower the sugar content and the stronger the flavor. Start sampling your kombucha after a week to determine your preference. Conditions should be between 70-80 degrees Fahrenheit. Warmer or cooler conditions can cause problems. Also avoid placing the container in direct sunlight. Signs that your kombucha fermentation is going well include an increasing vinegar odor, visible bubbles rising to the surface, and the formation of a new SCOBY on the surface of the tea. At first it will be nearly translucent, and then it will develop into a whitish, opaque, rubbery mat (see photo below – a new SCOBY forms on the surface, the previous SCOBY has fallen below). Brown strands, goop and other slimy things floating around are normal – these are strands of yeast. Anything green or that looks like mold forming on the SCOBY is not. A rotten or funky smell also is not normal. You can drink the kombucha at this point, or continue with a second ferment.

4. Second Ferment (Optional)
The second ferment is where you can get creative with flavors and build up some extra combination. Fruits, juices, herbs, herbs and extracts can be added for all sorts of flavor combinations. The general rule is to add about 10-30% fruit or juice to kombucha tea (see photo below). Fruit from the edible landscape or garden like raspberries, strawberries and blueberries work great. Try adding herbs like mint, lavender and lemon balm!
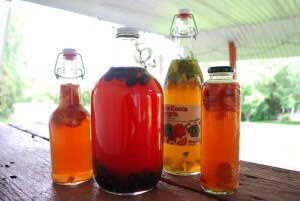
First place your fruit/juice/etc. into one of your tightly sealing jars, and then add kombucha from your first ferment, leaving an inch or two of headspace. Tightly seal the lid and allow to ferment for an addition 2-7 days or so. Be careful opening the containers, as depending on the conditions, a great deal of carbonation can build up. Some batches may turn out completely flat, while some will spray your ceiling with kombucha when opened. The tightness of the seal and how much sugar is in the second ferment at the time you cap it are big factors in creating carbonation. (Thus, if you are not getting enough carbonation, try cutting your first ferment short and/or increasing the fruit or juice added (for a natural sugar source); you can also try increasing the duration of your second ferment.) In the first photo below, you can see the proportions used: the jug on the left is just frozen blueberries, and the bottle on the right is a mixture of limes and mint, for a resulting flavor reminiscent of a mojito The second photo is after tea has been added (the smaller bottles are flavored with strawberries and fresh ginger). Once your second ferment is to your liking, refrigerate your tea to stop the fermentation process. Chilling can also have the effect of “setting” the carbonation.

5. The Ongoing Process
Whenever you remove kombucha from your main brewing container, just be sure to reserve at least 1 cup for your next batch. It is ok if there is more. The more kombucha present when you add fresh sweet tea, the faster the fermentation for your next batch will progress (for example, if you add half a gallon of sweet tea to half a gallon of fermented kombucha with the SCOBY, it will probably be ready to go in a couple days). Watch for signs of healthy activity and test flavor to determine “doneness.” Whenever disturbed, such as when you remove tea, your SCOBY will sink, and a new one will start to form on the surface. It’s ok to let these build up. Whenever they start taking up too much space, remove the older ones and leave a healthy SCOBY for future brews.
Do you love the idea of browsing your own yard for berries and herbs to flavor your homemade kombucha brews? We can help make that dream happen! Click the button below to learn more about working with Rustic Hills Garden Co!